Most traders know the polarity-flip idea: broken resistance becomes support, broken support becomes resistance. The problem is that on a price chart a level being retested looks identical whether it actually flipped or is about to fail. You are guessing.
On a footprint chart you don’t have to guess. The imbalance zones show you where buyers and sellers committed, and the statistics grid shows you whether fresh opposing orders are defending the level on the retest. That confirmation is the whole edge of the setup we call a Mirror Level. This article covers how a Mirror Level forms, then how to tell a real flip from a fake one using absorption, the COT Flip, and zone volume.
How a Mirror Level forms
A Mirror Level needs three things, in order.
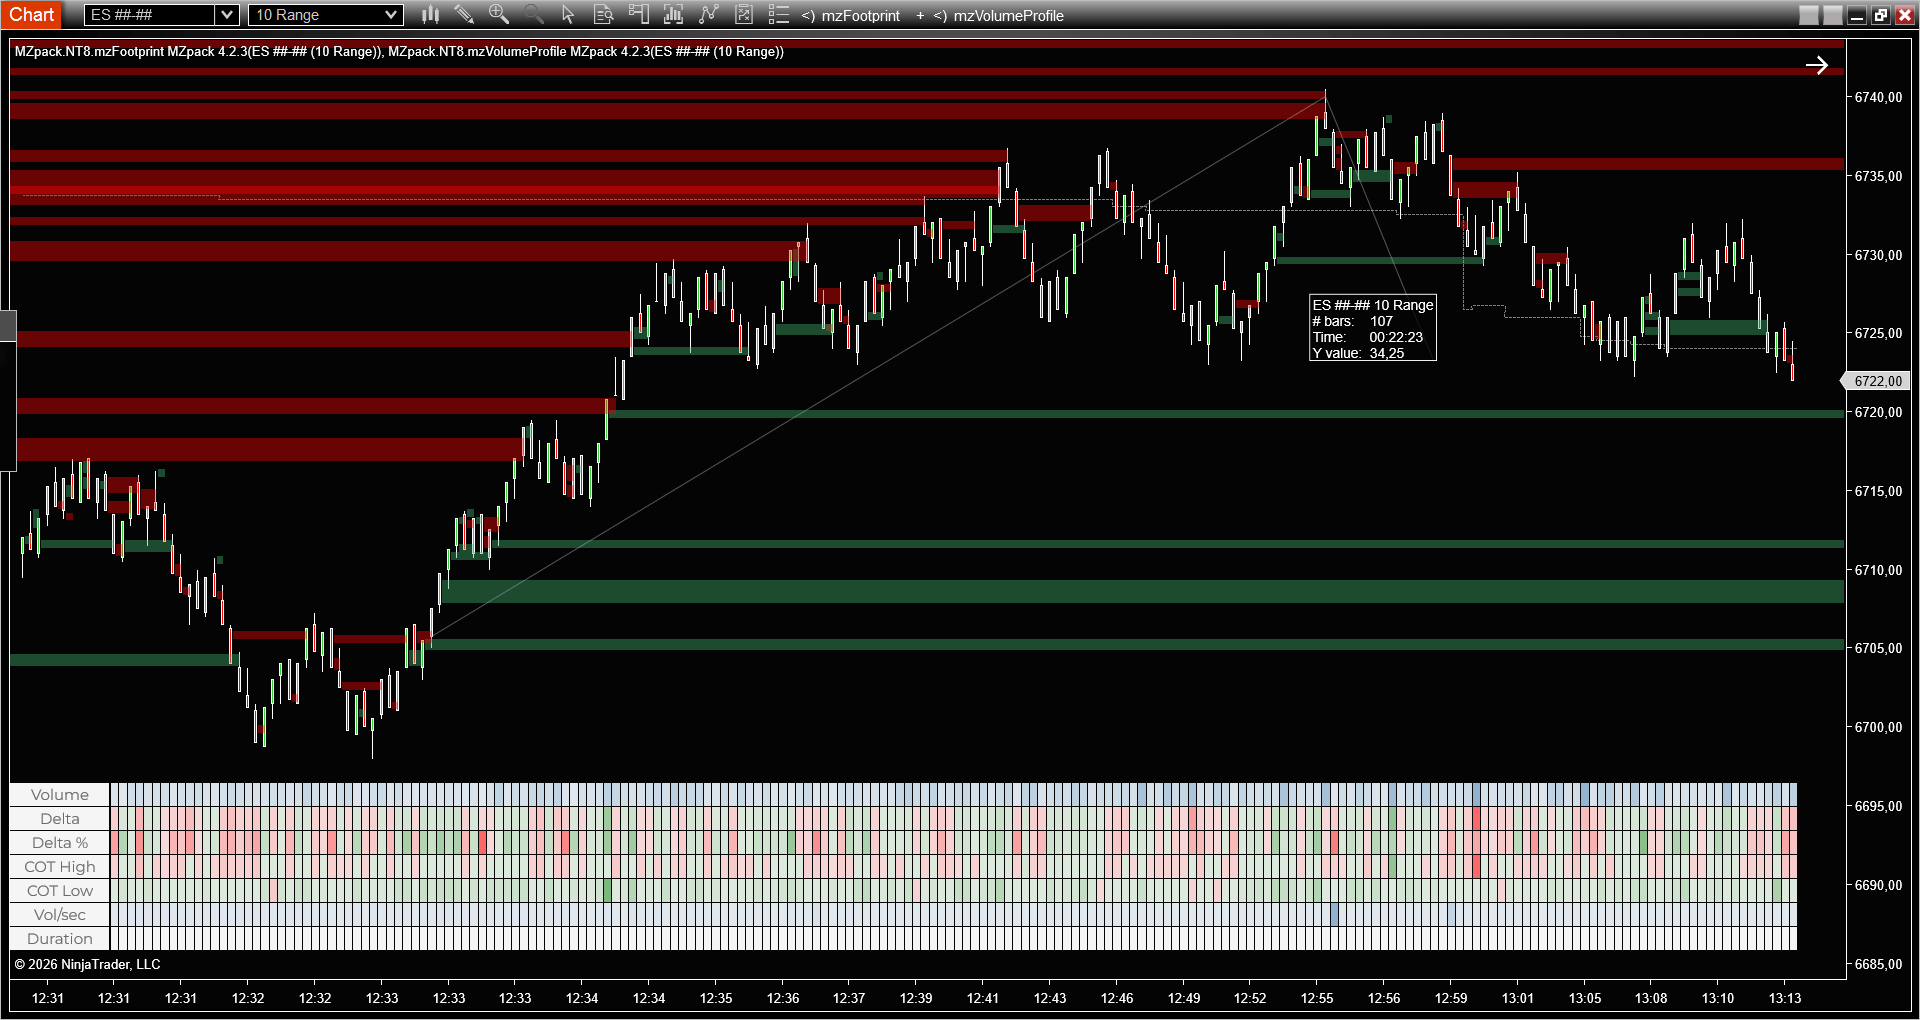
First, context: a strong directional move that repositions the market. For a long setup, price makes a sharp move down, leaving sell-imbalance Resistance zones behind it. This is not a setup you take inside a range. The move down is what makes the later flip meaningful.
Second, a return to the level. Price stops falling, bases, and comes back up to one of those old Resistance zones.
Third, the flip itself. Instead of rejecting price again, the level prints a fresh Support zone, built from buy imbalances, at the same price. The new Support overlaps the old Resistance, or at minimum prints with no gap between them. The level has changed polarity: the price that sellers defended on the way down is now defended by buyers. That is the mirror.

Entry is a long on the close of the bar that completes the flip. The stop is short by design: below the zone, or at most below the low of the bar that made it. For a short, every sign inverts: a prior move up, an old Support flipping to Resistance.
But forming a mirror and holding one are different things, and this is where most retests fail. The rest of the article is how to validate it.
Validating a Mirror Level: absorption first, then the grid
Once the context and the zone overlap are there, you validate the flip in three layers, in this order of priority.
1. Absorption – the primary filter
Absorption is what actually separates a mirror from a breakout, so it comes first. In mzFootprint, absorption is a diagonal imbalance with level rejection: aggressive market orders hit the level, limit orders eat them, and price bounces instead of pushing through. That is the order-flow definition of a level being held.
If the absorption flag fires at the overlapping zone, the level was defended and you have a mirror candidate. If it doesn’t fire, price went through the level rather than holding at it. That is a breakout or a stop run, not a mirror, no matter how large the delta or the zone volume looks. Everything below is secondary to this.
2. The COT Flip – direction and holding
When there is delta to read, the grid confirms which way the level flipped and whether the flip holds. COT High is the cumulative delta measured from the moment a bar prints its high; COT Low, from the moment it prints its low.
- Negative COT High: after the high was made, net selling followed. The high was rejected, sellers work the top. Resistance in numbers.
- Positive COT Low: after the low was made, net buying followed. The low was defended, buyers work the bottom. Support in numbers.
A genuine flip, the COT Flip, shows the commitment extreme migrating from the high of the bars to the low: COT High collapses toward zero, COT Low turns positive and stays there across more than one bar. Delta picks a side and holds it across consecutive bars, and Delta % expands well past the single-digit chop, often above 30%.
Two cautions the examples taught us:
- The flip holding for more than one bar is confirmation, not a precondition. At the close of the flip bar the next bar doesn’t exist yet, so this is either the signal for a conservative entry (wait for the confirming bar) or the way a false mirror is recognized after the fact (see the 215 case). On an aggressive entry, the short stop takes its place.
- COT Low should be a meaningful share of delta, not almost all of it. When nearly the entire delta is made off the low in one burst, with a Vol/sec spike, that is a stop run firing through the level, not absorption holding it.
And delta can be silent. A bar can post zero delta, zero Delta %, flat COT, and still be a valid mirror if absorption fired and the bar sits on the level. Balanced delta on a short, high-Vol/sec bar is itself an absorption signature: both sides are aggressive and limit orders are holding the line. Do not disqualify a mirror for lacking a big delta. Absorption is primary; the COT Flip adds confidence only when delta is present to read.
3. Zone volume – the conviction gradient
The total volume in the mirror zone scales how much committed size showed up to defend it. A thick zone is more reliable than a thin one. This is not a hard line: a thin zone that holds, with absorption present and the flip holding, is still a valid mirror, and a thick zone that doesn’t hold is still a breakout. Use zone volume as a gradient, not a gate.
On the chart you can lean on it directly: raise the S/R zones volume filter and the thinnest zones stop drawing, which removes a slice of weak mirrors before you even read the COT. In a scoring model the same number works better as a percentile against recent zones than as an absolute threshold, since what counts as thick depends on the instrument and the session.
What the four cases look like
Four bars cover the full spectrum, one per axis.
Valid mirror, delta silent
Find the bar reading Volume 846, Delta 0, Delta % 0, COT High 0, COT Low -13. The grid is almost flat, yet the bar lasted only about 8 seconds with Vol/sec at 101, above its neighbours. That balance plus speed is the absorption signature: both sides aggressive, limit orders holding the line. Absorption fired, the bar sits on the level, the zones overlap. The structure held with no directional delta at all. This is the case that proves absorption is primary, since a rule that demanded a big positive delta would have thrown the setup away.
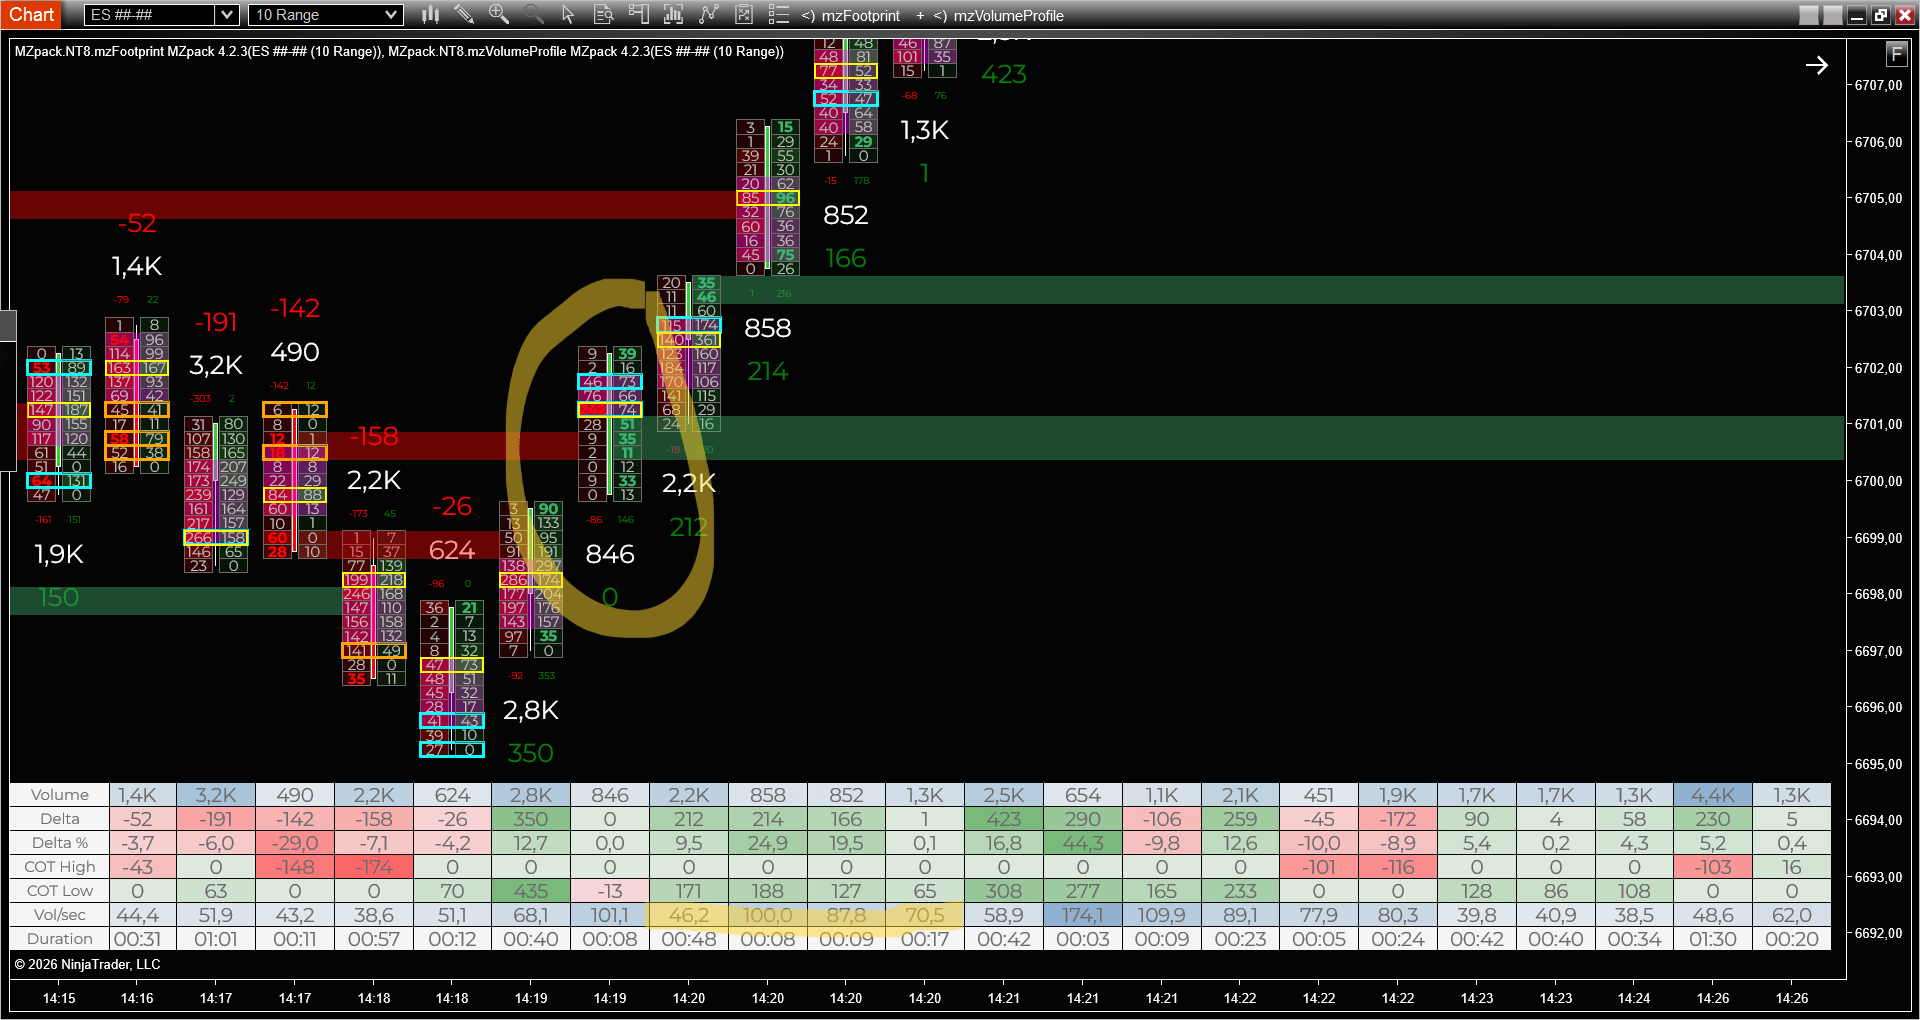
Valid mirror, silent delta. Volume 846, Delta 0, COT Low -13, an 8-second bar with elevated Vol/sec. Absorption holds the level with no delta to read.
Outcome. The level held and price ran up from the entry.
Valid mirror, thin zone
Here the mirror zone totals only 88 contracts, which is light. But absorption fired and the COT Flip held across the next bars (Delta 188, 84, 169, 138; Delta % 33.8, 16.5, 42.8, 21.6; COT Low 150, 71, 153, 148, 131). Thin does not mean false: a light zone that defends its level is still a mirror. Compare it directly with the next case, where a similarly thin zone of 33 contracts failed.
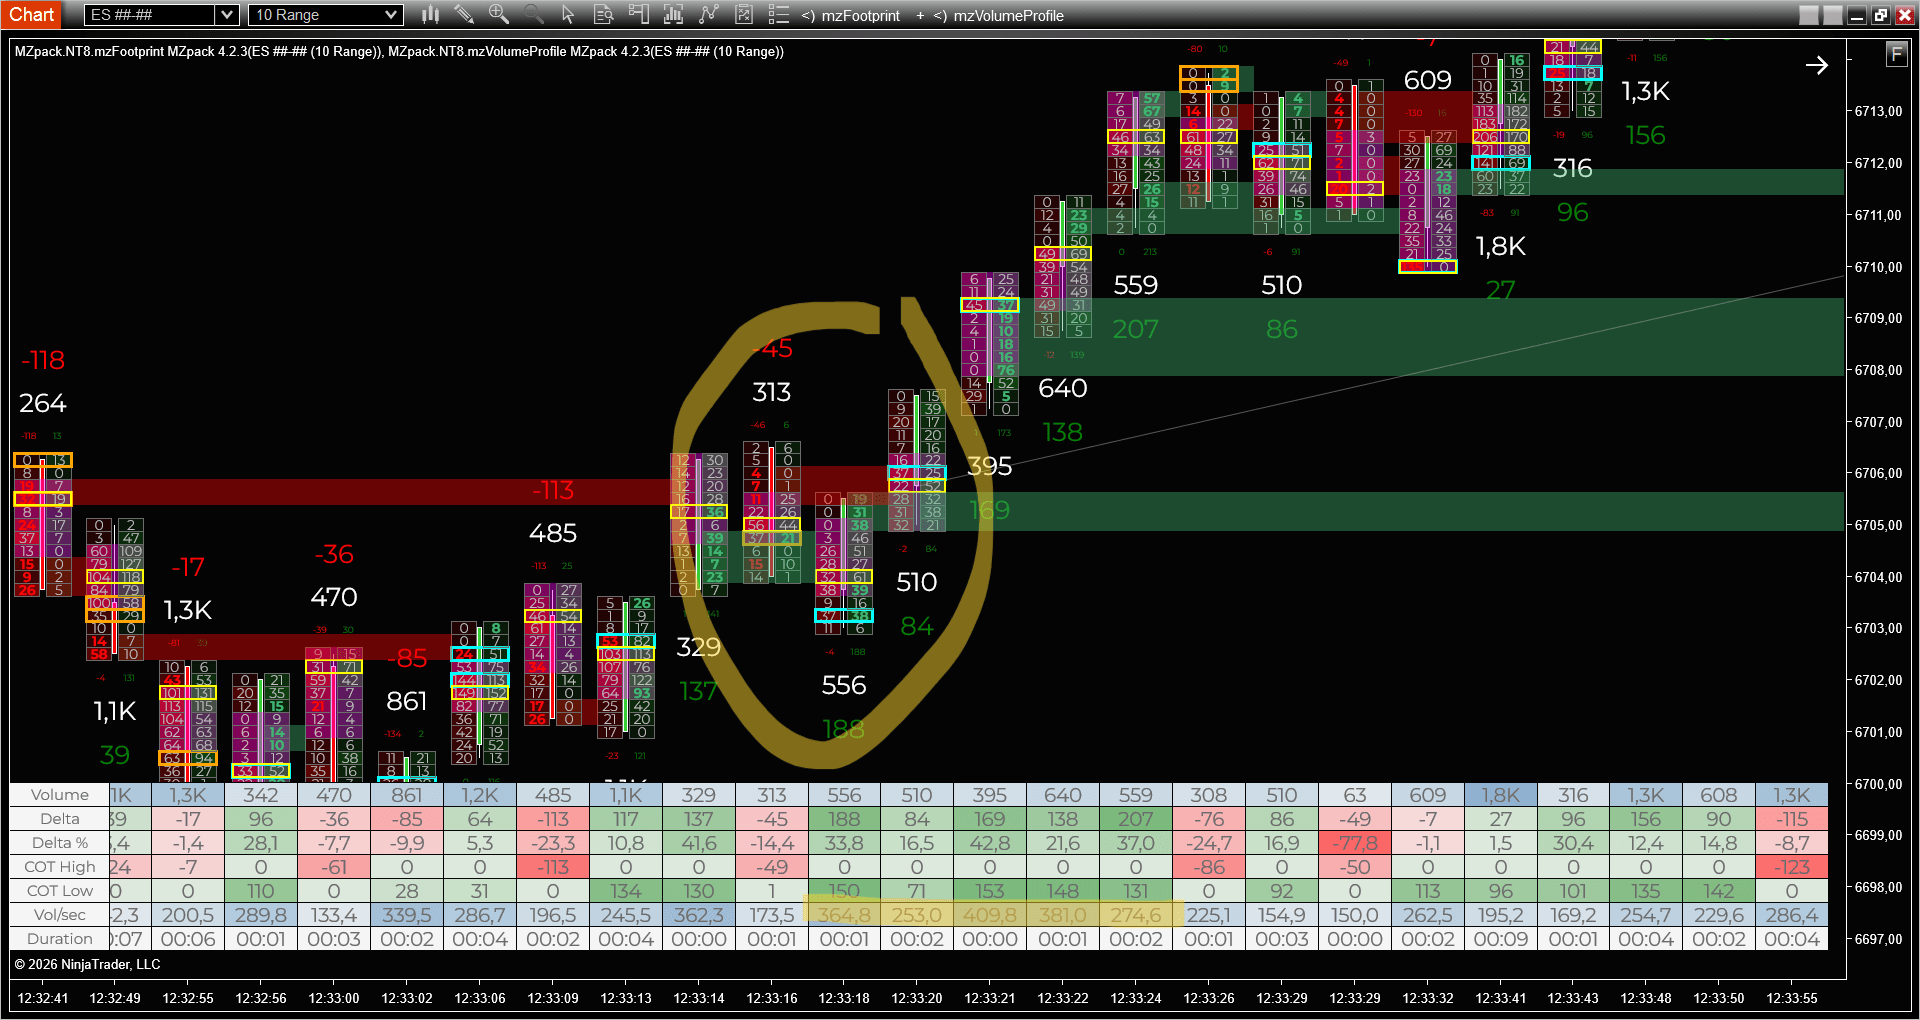
Valid mirror on a thin 88-contract zone. Low zone volume, but absorption present and the COT Flip held.
Outcome. A thin zone, but it held and price moved up from the entry.
False mirror, one-bar flip
The tempting bar reads Volume 215, Delta +97, Delta % 45.1, COT High 0, COT Low +98, on a thin zone of 33 contracts. By the four grid tells it is a clean bullish bar, but absorption never fired, and that alone disqualifies the level: the bait is the grid while the primary filter stays silent. The grid then confirms it on the next bar: Volume 646 prints Delta +8, Delta % 1.2 and COT High -82, the commitment jumps straight back to the high, sellers return, delta dies. The flip lasted one bar. No absorption, no follow-through, no trade.

False mirror. Bar 215: no absorption; Delta +97, Delta % 45, COT Low +98, then the next bar (646) flips COT High to -82. A touch, not a flip.
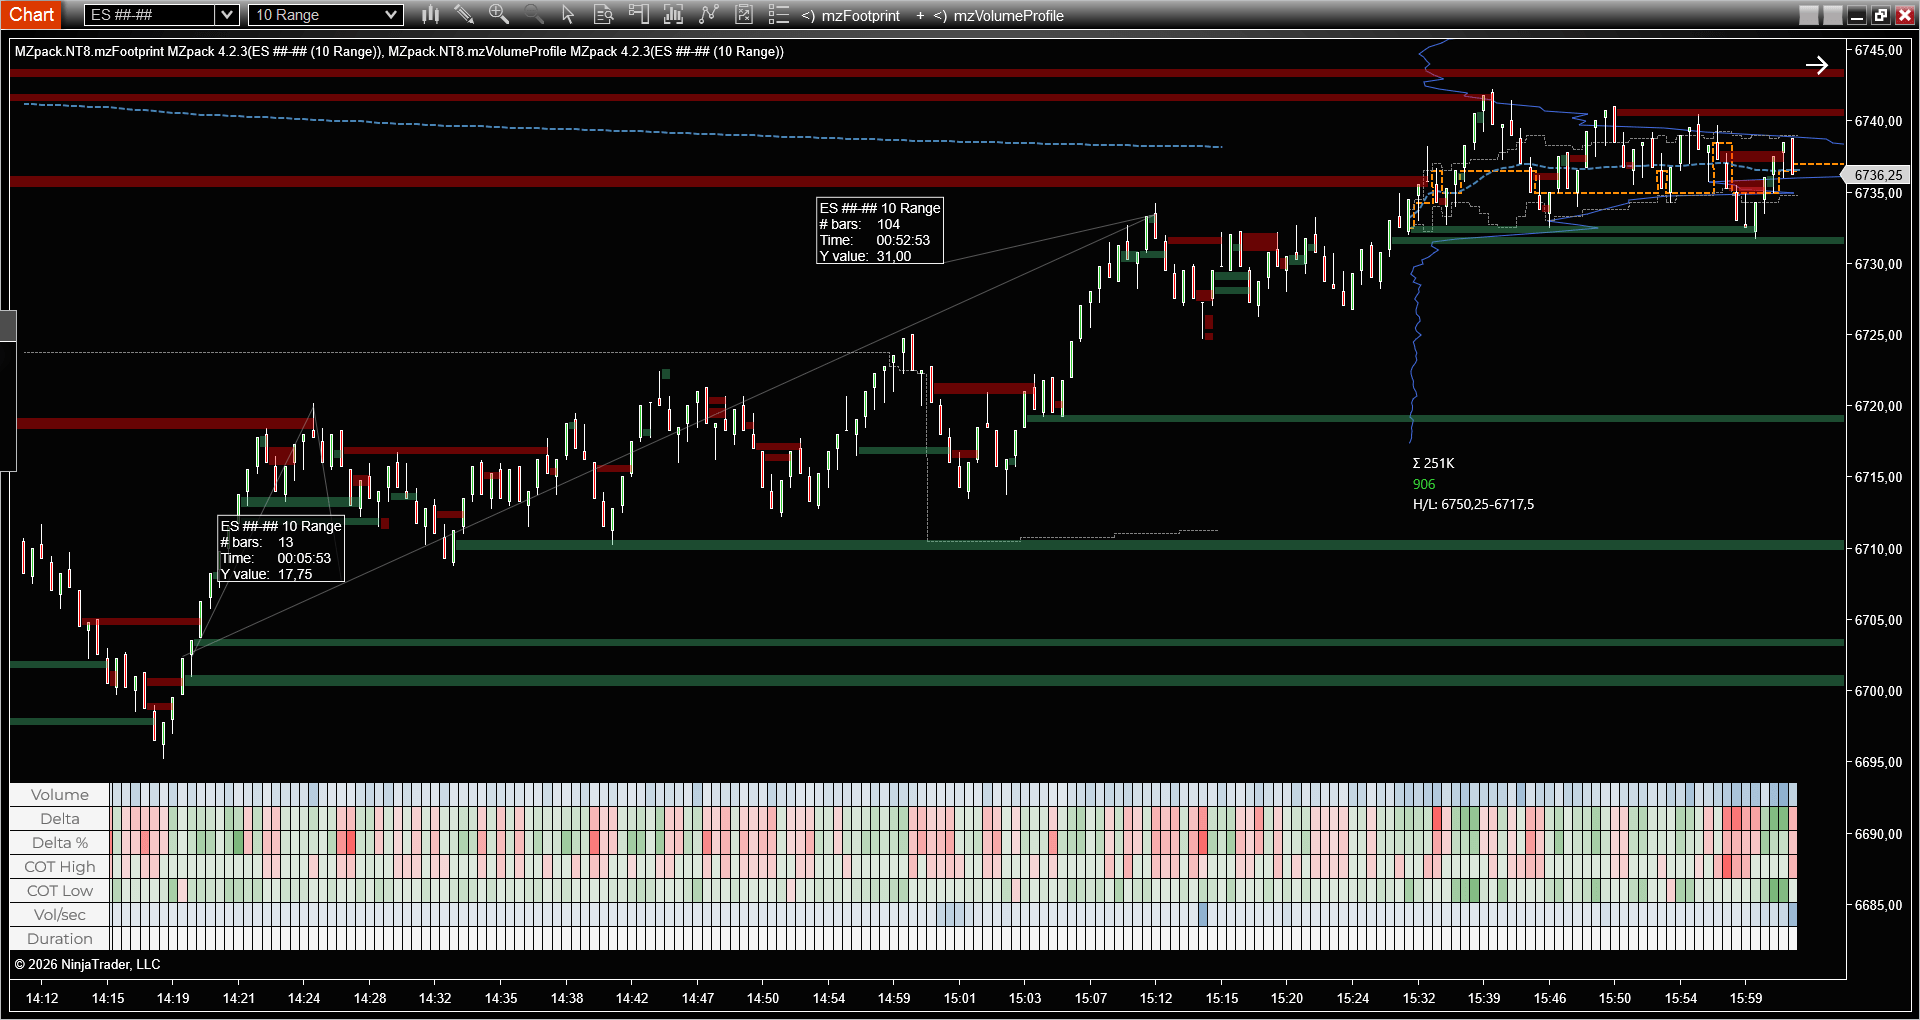
False mirror, stop run
Everything the naive reading wants: Volume 1.9K, Delta +962, Delta % 49.5, COT entirely on the low at +709, on a thick zone of about a thousand lots. But COT Low is roughly three-quarters of the whole delta (709 of 962), made off the low in one burst, and Vol/sec spikes to 392.8, far above its neighbours (around 145). No absorption fired. Price ran through the level on stops and kept going for points. It even paid, which makes it the most dangerous case: a real profit taken for the wrong reason, on a setup that was never a mirror.
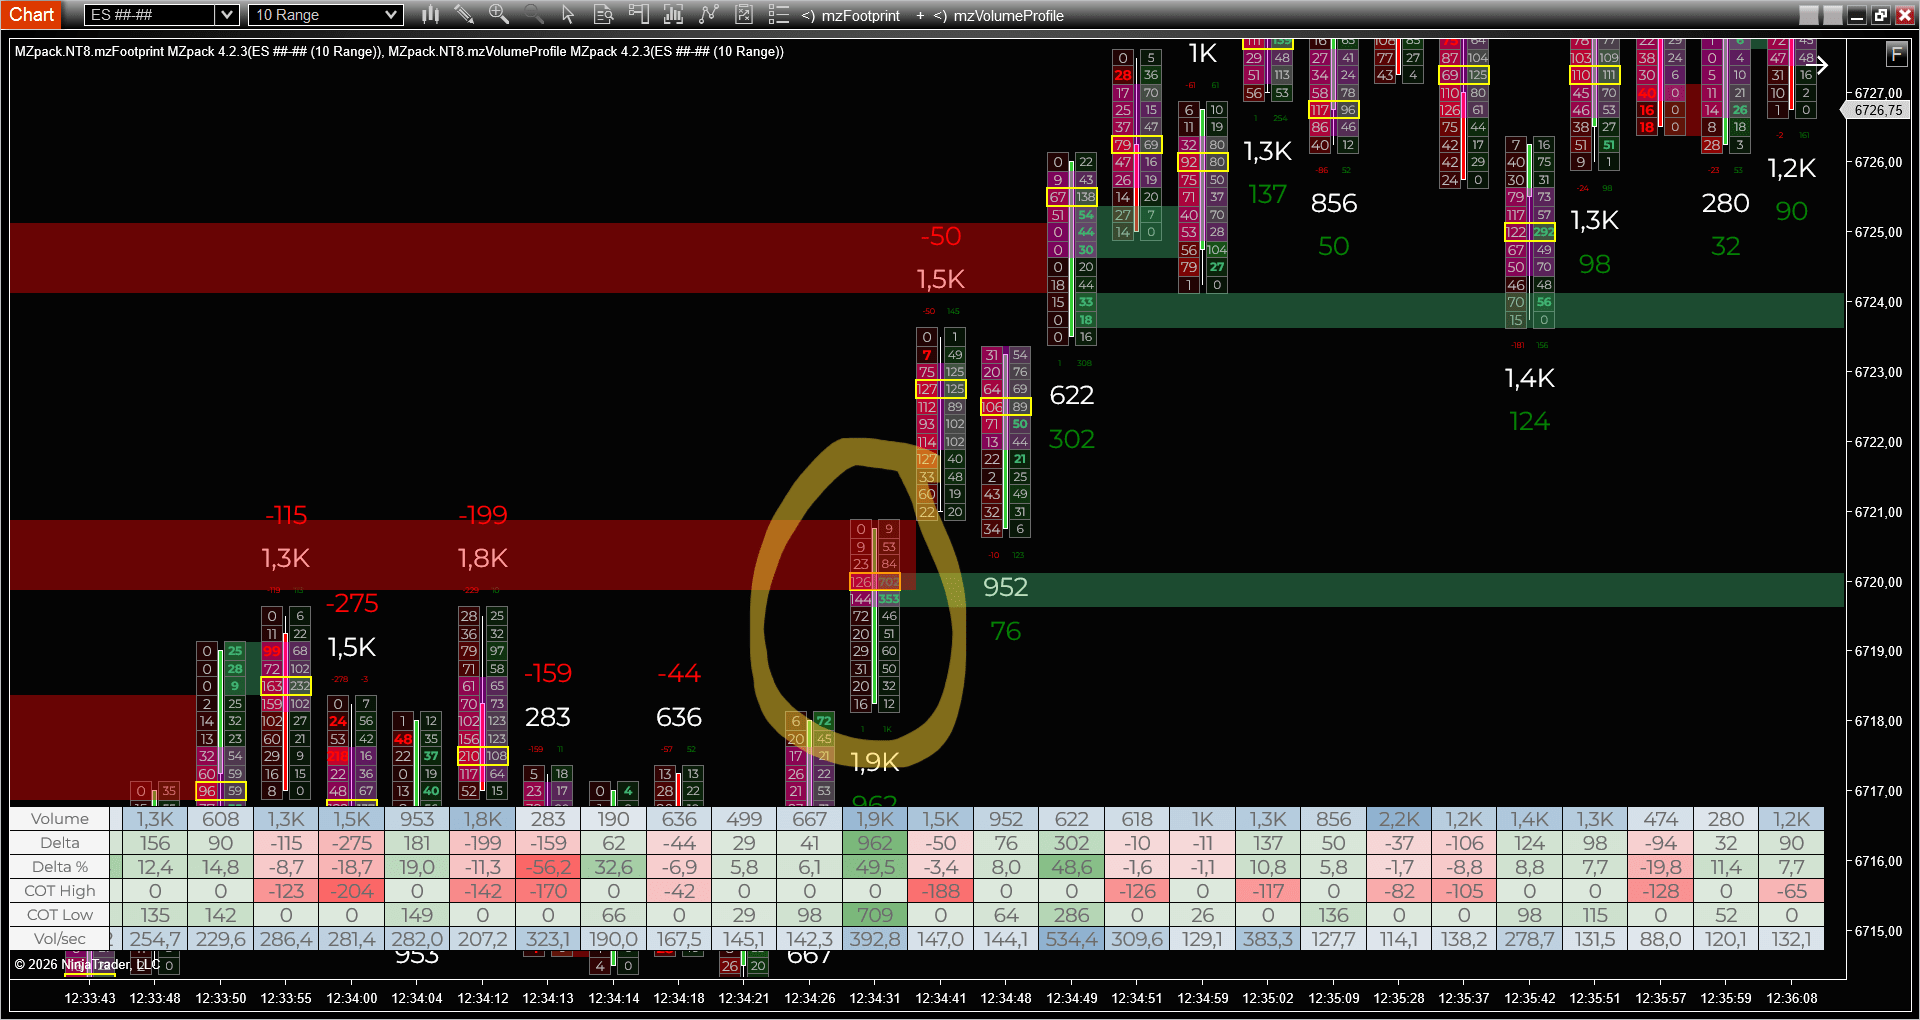
False mirror, stop run. Volume 1.9K, Delta +962, COT Low +709 (about 74% of delta), Vol/sec 392.8, no absorption. Price broke through, it did not hold.
The last case is the lesson worth repeating: a thick zone and a big delta are not a mirror if price went through the level instead of holding at it. Read absorption first.
Entry, aggressive and conservative
The setup gives two entries.
Aggressive: on the close of the flip bar. At that moment you already know everything you need right now: context in place (prior move down), Resistance and Support overlapping, absorption fired on the level, and a positive COT Low on that bar. You don’t know the future, and you don’t need to. Protection against a one-bar fake isn’t foresight, it is the short stop below the zone, or at most below the low of the bar that made the zone. A fake just stops you out, and the cost is small.
Conservative: wait the next one to three bars for confirmation (your call). COT Low stays positive, COT High doesn’t drop negative, and you enter on the close of the confirming bar. Fewer trades and a worse entry price, but the one-bar flips get filtered out.
Invert every sign for a short.
A false mirror is whatever fails the hierarchy, and both example failures fail it at the top, on absorption. Case four runs through the level (a stop run) and baits you with a thick zone and a big delta. Case three baits you with the grid instead, a one-bar COT Flip that looks bullish, but absorption never fired and the flip doesn’t hold past that bar. Absorption-first rejects both before you enter; the grid and zone volume only explain how each one baited you. The absorption flag and this bar’s COT are visible before you enter; whether the flip holds is known only after.
Settings to surface all of this
In the mzFootprint statistics grid, switch these columns on:
- COT High: show
- COT Low: show
- Delta: show
- Delta %: show
- Volume: show
- Volume per second: show
For the zones, under Imbalance, enable S/R zones and set consecutive levels, volume filter, and ended by for your instrument. Keep Absorption enabled so the flag fires – it is the primary filter, so it has to be visible. The mirror itself is not a parameter you set: you read it on the chart as a returning Support zone overlapping the prior Resistance, with absorption on the level.
Download chart template →